ActiveX Control Properties, Methods, and Events
Communication between an ActiveX control and a web page is done through ActiveX control properties, methods, and events. In order to demonstrate these concepts, we will create a simple web page with a form entry to enter a text string. When a Submit button is pressed, the text entered is passed to the ActiveX control through an input parameter custom property. A method of the control is called which copies this text to an output parameter custom property, and then fires an event for this text to be displayed on the web page. Simply follow these steps in Visual Studio to implement this:
- First, we will create the custom properties for passing text to and from the ActiveX control. In Class View, expand the element MyActiveXLib to select _DMyActiveX. Right click on _DMyActiveX, then Add, Add Property. In the Add Property Wizard dialog as shown in Figure 9, select
BSTRfor Property type, and enter “InputParameter” for Property name. The wizard will fill other fields automatically for you with “m_InputParameter” for Variable name and “OnInputParameterChanged” for Notification function. Click the Finish button where the wizard will automatically create the code to support this property. Do the same for Property name “OutputParameter” with the same Property typeBSTR. Figure 9. Add Property Wizard
 - Next, we will create a method to enable the web page to notify the control to transfer the text string input parameter to the output parameter. In Class View, expand the element MyActiveXLib to select _DMyActiveX. Right click on _DMyActiveX, then Add, Add Method. In the Add Property Wizard dialog, as shown in Figure 9, select
voidfor Return type and enter “LoadParameter” for Method name. The wizard will automatically enter “LoadParameter” for Internal name. Click Finish where the wizard will automatically create the code to support this method. Figure 10. Add Method Wizard
 - Now, we will create an event that enables the ActiveX control to notify the web page that it is completed transferring the text from the input parameter to the output parameter. Code in the web page will react to this event and respond by displaying the text in the output parameter to verify that this transfer has occurred by the ActiveX control. In Class View, right click on
CMyActiveXCtrl, select Add, Add Event. In the Add Event Wizard, as shown in Figure 11, enter “ParameterLoaded” for Event name and change Internal name to “FireParameterLoaded”. Click Finish for the wizard to create the default code to support this event.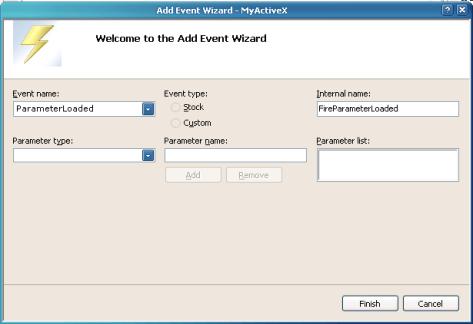 Figure 11. Add Event Wizard


With the above, the wizard has created a majority of the code for you. We only need to add two lines of code to implement the functionality for the ActiveX control to copy the text and notify the web page code through an event. Edit the source file MyActiveXCtrl.cpp, and add the following code to the
LoadParameter method.
Hide Copy Code
// Copy text from the input parameter to the output parameter
m_OutputParameter = m_InputParameter;
// Fire an event to notify web page
FireParameterLoaded();
To test, use the ActiveX Control Pad to create the following HTML code:
Hide Shrink  Copy Code
<HTML>
<HEAD>
<TITLE>MyActiveX - Methods, Properties, and Events</TITLE>

<SCRIPT LANGUAGE="JavaScript">

function PassParameter()
{
    if (StringInput.value != " ")
    {
        MyActiveX1.InputParameter = StringInput.value;
        MyActiveX1.LoadParameter();
    }
}
</SCRIPT>

</HEAD>
<BODY>
<center>
MyActiveX - Methods, Properties, and Events Example
<p></p>

<OBJECT ID="MyActiveX1" WIDTH=350 HEIGHT=50
 CLASSID="CLSID:36299202-09EF-4ABF-ADB9-47C599DBE778">
    <PARAM NAME="_Version" VALUE="65536">
    <PARAM NAME="_ExtentX" VALUE="2646">
    <PARAM NAME="_ExtentY" VALUE="1323">
    <PARAM NAME="_StockProps" VALUE="0">
</OBJECT>
<p></p>

Input Parameter: <INPUT TYPE ="text" NAME="StringInput" VALUE=" ">
<p></p>
<INPUT TYPE="button" NAME="Submit"
       VALUE="Submit" ONCLICK=PassParameter()>

<SCRIPT FOR=MyActiveX1 EVENT=ParameterLoaded()>
<!-- {
   window.document.write("The parameter you entered is:<br> "
                         + MyActiveX1.OutputParameter + "  ")
-->
</SCRIPT>

</center>
</BODY>
Save this HTML code to your web server, and run it. You should see a web page with a progress bar displayed and a form entry to enter the Input Parameter text. Enter text in the field, and press Submit. This should result in a new page with “The parameter you entered is: ”, followed by the text you entered on the next line. A brief explanation of the HTML code follows.
When you press the Submit button, the JavaScript function
PassParameter is invoked. This function copies text from the StringInput form field to the InputParameter property of the ActiveX control. It then calls the LoadParameter method of the control which copies the text from InputParameter to OutputParameter and calls FireParameterLoaded() to cause an ActiveX event. The following HTML code then responds to this event:
Hide Copy Code
<SCRIPT FOR=MyActiveX1 EVENT=ParameterLoaded()>
<!-- {
  window.document.write("The parameter you entered is:<br> " +
                        MyActiveX1.OutputParameter + "  ")
-->
</SCRIPT>
No comments:
Post a Comment